
PRINTER TROUBLESHOOTING TIPS
This page includes a collection of articles to help you troubleshoot your printer problems and see how intricate the process is to fix them.
Articles include:
How a Laser Printer Works
Maintenance and Troubleshooting Tips for Laser Printers
Common Printer Problems and how to fix them
Laser Printer Features and Technology
How a Laser printer works
Laser printers rapidly produce crisp print documents and images, making them a popular choice for personal and business use. Because of the name, it is natural to think that laser printers use a laser actively on the paper in some way. However, laser printers actually harness static electricity to print, although lasers do play a role in the printing process.
Step 1: Incoming Data
The first step of the printing process in a laser printer is the transmission of the data from the computer or data storage device to the printer’s image processor. The image processor rasterizes the data and converts the received information into a graphic image; this is then sent to the printer’s memory in preparation for ‘transmission’.
Step 2: Drum preparation
The single largest part of the laser printer is the drum, an aluminum cylinder coated with photosensitive material. In preparation for printing, the drum must be cleaned to remove any traces of previous pages. First a rubber blade wipes excess toner from the drum and then erase lamps or a charged drum electrostaticly clean it by neutralizing residual electric charges on it.
Step 3: Drum writing
The data in the printer’s memory is written to the drum using a laser. Rather than writing it with ink or toner, however, it writes by shining a very precise laser on the photosensitive drum in certain spots, changing the electrical charge in those spots. As the drum cylinder rotates past the laser, it sweeps across the surface, turning on and off to neutralize certain areas to about -100v. These neutralized areas will be the spots where toner adheres to the drum later in the process and then transfers to the paper.
Step 4: Paper feed
Now it’s time for the paper to join in. Feed rollers draw the paper into the printer from the paper tray. Registration rollers hold the paper until it’s time for it to be released, making sure that the top of the paper feeds in exactly at the moment when the laser image of the page that’s on the drum rotates past it. 
Step 5: Toner pickup
Steps 4 and 5 occur more or less simultaneously; as the paper is being drawn in, the toner is being applied to the drum.
The toner cartridge contains a rotating, magnetic, metal-developing cylinder, a toner reservoir, and a height control mechanism that limits the amount of toner the cylinder can pick up at a time. Toner consists of plastic resin particles (the particles that melt to produce the image on paper) and iron oxide (the particles that are affected by magnetic attraction and electrical charges). The toner’s metal particles adhere to the magnetic cylinder, and the cylinder presents the toner to the drum as it passes by. The developing cylinder is charged to -600v, like the blank portions of the photosensitive drum, and the toner adhering to the cylinder also takes on that same charge.
As the drum passes by the cylinder, the toner ignores all the areas charged to -600v because that’s the same charge as itself. It jumps off and clings to the areas with the lesser charge (-100v), however, and that’s what makes the toner stick to the drum.
Step 6: Toner transfer to paper
As the paper feeds into the printer, the transfer corona applies a +600v (positive) charge to the paper. When the paper passes by the drum, the -100v charged toner on the drum jumps off onto the positively charged paper. Then, the paper runs past a static charge eliminator, which is a row of teeth with a negative charge that reduces the paper’s highly positive charge.
Step 7: Fusing the toner to the paper
The image is now on the paper, but it’s not secure there; it’s just loose toner held in place by gravity and a weak electrostatic charge. For permanent application, it must be fused. Fusing is basically melting the toner’s plastic particles so they stick, or fuse, to the fibers in the paper.
The fuser roller is a nonstick cylinder with a high-powered lamp inside it that heats the paper to around 330 to 355 degrees Fahrenheit. As the paper passes by it, the toner melts. A fabric or felt-cleaning pad, in constant contact with the fuser roller, helps keep it clean. With many laser printers, you change the cleaning pad whenever you change the toner cartridge.
The final part of the fusing assembly is the pressure roller. It’s a rubber roller that presses against the fuser roller; the paper feeds between it and the fuser roller on its way through the printer. The fuser roller can leave an indent on the softer pressure roller because of the heat it produces, so the printer’s internal software will rotate the assembly periodically to keep this from happening.
That’s how a laser printer works. Each printer has built-in sensors at critical points that check whether the paper is in the right place for that step to occur. The printer knows how long it should take for the paper to move from one sensor to the next, and if the paper is delayed, the printer gives you a paper jam message.

Maintenance and Troubleshooting tips for Laser Printers
Computer technicians, help desk professionals, and administrators can spend an inordinate amount of time dealing with laser printer problems. If you’d like to streamline the amount of time you spend with laser printers, then you should master some of the maintenance, troubleshooting, and repair techniques in this article.
Cleaning
Cleaning can go a long way towards keeping a laser printer running smoothly. The exterior of the printer can be cleaned with a water-dampened cloth or a cleaner rated for electronics. The interior can be cleaned with a small vacuum or with compressed air. If you are using compressed air, remove the fuser assembly to allow a path for dirt and debris to exit the printer. The interior can be further cleaned with a dry, lint-free cloth.
Troubleshooting: Paper Jams and Image Problems
The first step in troubleshooting is determining the nature of the problem and then concentrating on a specific area.
Errors are often written to a status log. The status log can usually be viewed by printing a self-test/configuration page. Of course, if the problem is keeping the printer from printing, then the configuration page will not be available.
More severe errors may indicate a problem with the electronics. The service manual usually details each error and the corrective action needed. Error codes and their meaning can also be researched on the vendor’s Web site. Although problems with the printer’s electronics do occur, the bulk of the problems are mechanical. The mechanical issues usually occur in two common forms: paper jams and image problems.
Paper jams
By far, the most common complaint is the paper jam. If there is a paper jam, determine the area where the jam is occurring and examine the area. Most jams occur due to a paper path blockage or a worn roller. I have been called to repair a paper jam and, often, find the cause to be a small piece of paper that was not removed from a previous jam. Many times, the paper itself is the cause of the jam. Poorly installed paper, or paper that has been stored improperly and allowed to curl prior to installing it in the paper tray, can lead to paper jams.
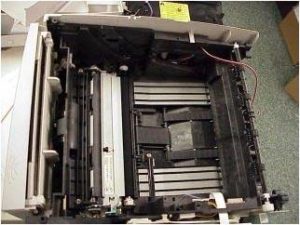
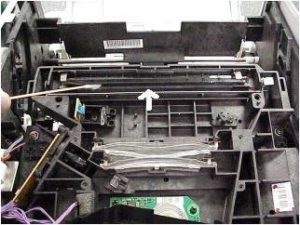
If the paper makes it inside the printer and stops, look for paper debris or other material that may be blocking the paper’s path. Also, examine any associated rollers for wear. Internal jams are typically caused by a blockage. A small vacuum, or compressed air, can be used to remove debris from inside the printer. When looking for the culprit of an internal jam, remove the top cover, fuser, and laser-scanning assembly to get an unobstructed view of the internal components
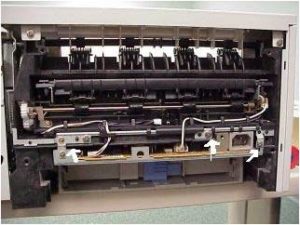
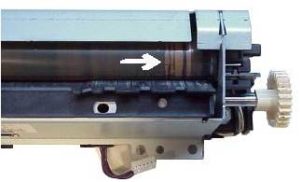
If the paper jams at the fuser, suspect a blockage in one of the fuser rollers. The fuser is typically a field replaceable assembly and is usually easy to remove. Remove the fuser to examine it for paper debris, worn gears, or other mechanical problems. Remove the screws securing the fuser and any electrical connections
If the fuser appears to be working properly, examine the entrance and exit paths to the fuser. Also inspect the exit rollers for missing or damaged components. Every component in the paper path must be clean and smooth for the paper to travel through without problems.
Image problems
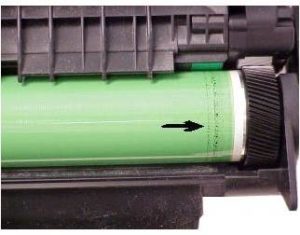
Any deterioration in the quality of the image is directly related to one of the components in the image subsystem. The first step in image troubleshooting is to examine the toner cartridge. The toner cartridge contains the drum and developing rollers. If either of these components becomes damaged, it will result in an image problem. Inspect the drum for marks or debris. The drum can be inspected by pulling back the plastic shutter that protects it when it is removed from the printer (but, remember that the drum is sensitive to light; so, do not expose it to bright light for long periods of time).
The most common problems are scratches or lines around the drum. These lines will transfer to the image. If the complaint is a solid or partial line on the image, inspect the drum for a matching set of lines. Replace the toner cartridge if the drum appears damaged or if you suspect the drum to be the cause of the image problem. If you replace the toner cartridge and the lines remain, then there’s a good chance that the problem is with the drum.
The fuser can also be the source of image deterioration. Scratches or damaged areas of the fuser can result in missing or smudged areas on the printout. Remove the fuser, and examine it closely for damage or deterioration.
HP has recommended intervals for replacing the fuser, typically around 150,000 printed pages. For most models of its printers, HP sells a maintenance kit, which includes the fuser and other replaceable rollers and belts. Most printers can print a configuration or test page that lists the number of pages printed. This can be used as a general guide; but, you should also examine the print quality by printing a test page. If you see smudged or missing lines, replace the fuser. If the fuser is bad, then you should also replace the rest of the recommended parts as part of an “overhaul.”
If the image appears blurred or distorted and you have ruled out the toner cartridge and fuser, check the transfer roller and laser-scanning assembly. A worn transfer roller can cause a “faded” image symptom. The transfer roller cannot be cleaned; it must be replaced. Also, dirt or debris on a lens or mirror of the laser-scanning assembly can distort the beam and cause image problems. Remove the screws securing the top, and examine the interior. Carefully examine and clean the reflecting mirror and lenses. Typically, the laser assembly can easily be removed for cleaning or replacement. In the HP 2100, four screws secure it to the interior of the printer chassis.
Common printing problems with laser printers and how to fix them.
In this article I recommend replacing certain parts, but unless you are a technician working for an authorized service center, you might not be able to get the needed parts easily.
Loose or smeared toner
Smeared output is a result of refeeding printed page into the printer to make a double-sided page. This happens because the rubber rollers that grip the paper pull it into the printer can pick up toner form the first side’s printing and smear it.
Vertical white areas
A quick fix is to change the toner cartridge, even if it isn’t empty.
Gray Mist
If the white areas look like they have been lightly sprayed with a gray mist, making them look slightly dirty or dingy.
This can also be the result of turning the printer’s print density control up too high. The newer the drum, the lower this setting can be. As the drum ages, you must turn up the print density control higher to achieve sharp black printouts. However, if you turn it up too high, the entire page acquires a dirty gray tinge. Some printers include the drum in the toner cartridge, so you get a new one each time you change toner. On other printers, the drum is separate, and you must eventually replace it when it wears out.
Printing not dark enough or varied in darkness
If the print is a dismal gray rather than a sharp black, you are probably almost out of toner. This can manifest itself evenly across the entire page or in splotches or stripes, depending on the printer.
Horizontal black lines
A horizontal black line on the printout is probably the result of a dirty or damaged roller.
All white page
White pages are a result of the printer not working correctly
All black page
Black pages are a result of the printer not working correctly
Faded print
Perhaps the most common image quality problem is when a printed page appears faded in some areas. People traditionally associate this problem with the printer being low on toner, but this isn’t necessarily the case.
Clumps of toner
Another common problem is that there may be clumps of toner on the printed page. This problem is typically caused when a printer is overworked and hasn’t been cleaned in a while. Excess toner accumulates in the printer, where it eventually manages to get on the paper and pass through the fuser. A leaky toner cartridge can also cause the problem.
Blank spots
Still another print quality problem occurs when small areas on the printed page are completely blank. Sometimes this problem can be attributed to a damaged fuser.
Gibberish
The most common cause of gibberish is using the wrong printer driver. For example, if you use a driver for an inkjet printer to print to a laser printer, the resulting print will be gibberish. This will also be the case if you send postscript codes to a printer that doesn’t support postscript printing.
But why do you sometimes get gibberish even when you’re using the right driver? Laser printers hold a print job in memory until the entire page has been received before printing that page. If the person who printed before you used the wrong driver, then it’s likely that some remnants of that print job remain in memory. When you send your print job, your job is appended to what’s already in the printer’s memory, resulting in gibberish.
Other causes of gibberish
Occasionally, you may run into a situation in which no one has used a bad driver, but the printer is spewing out garbage anyway. I’ve also seen situations in which a printer’s system board has gone bad. Power surges can damage a printer to the point where the printer never completely stops working, but it doesn’t print anything readable. Most of the time you can run a printer’s built-in diagnostic tests and print a test page to determine if this is the case. If the printer can’t even print the built-in test page, then it’s usually safe to say that the system board is bad. In such a case, you should contact your hardware vendor for service.
